Subject: Digiscoping with Ricoh GXR and Swarovski 80 HD STM [Print This Page] Author: lwingkay Time: 10/10/2010 10:29 Subject: Digiscoping with Ricoh GXR and Swarovski 80 HD STM
In another forum, I was asked about the details of my present digiscoping setup. Would like to recapture my answers here for the purpose of sharing, which is, in my personal opinion, important to digiscoping as most of the things we use on the fieldscope are DIY by nature. Here we go.
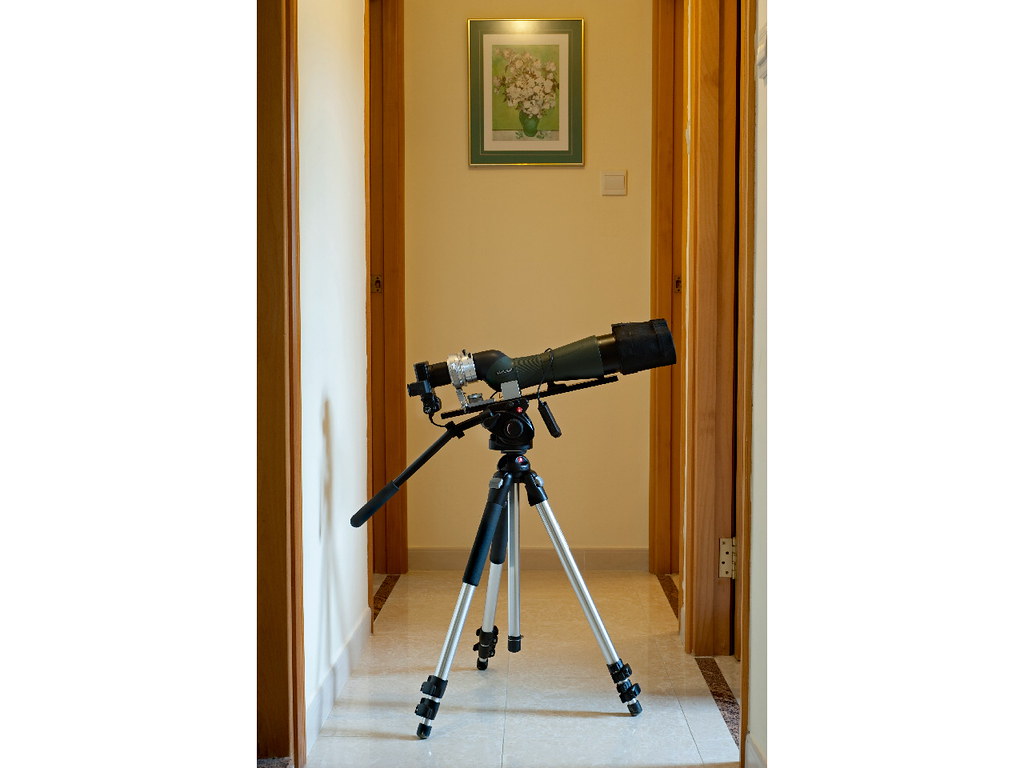
I. Photo of Setup
II. The parts involved
From rear to front:
1. Ricoh GXR + Electronic View Finder + Self Release Cable
2. Ricoh Adaptor for wide- and telephoto lens units
3 DIY Adapator for linking the Ricoh with the felescope with the telescope eyepiece enclosed inside
4 Swarovski 80 HD STM fieldscope
5 DIY Lens Hood
The support for the digiscoping set from the top to the bottom
1. A long plate for affixing the digiscoping setup (40cm long)
2. Manfrotto Video Head (Model 5001)
3. Manfrotto Tripod
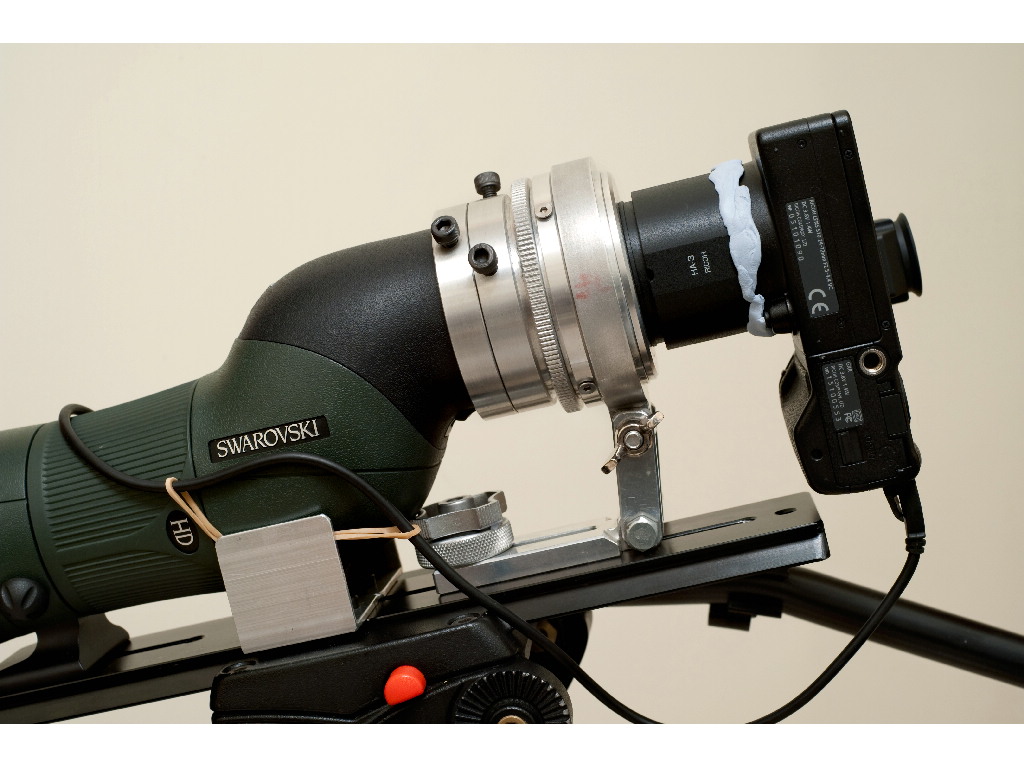
III. Photo of the adaptors linking the fieldscope with the camera
IV. Description of the parts
1 The adaptor
It is a DIY. As you may know, in the adaptor, the eyepiece is housed. In my DIY, the adaptor is fastened to the eyepiece by two screws. The connection is much stronger than Swarovski DCA or UCA for two reasons: the internal diameter of the DIY is so designed as to match perfectly with the barrel's; and the screws further bite at the barrel making it difficult for the DIY to come off despite rough manuvering in the field.
It is worth mentioning that the matching of diameters allows for central alignment to be achieved with ease. In the case of proper alignment, the four corners receive equal light from the eyepiece, so image clarity can be attained throughout the field of view and the falling off of light intensity on the side away from the central alignment can be reduced to the minimal. My experience with digiscoping is that the problem with central alignment is difficult to resolve. Often time, we blame about the quality of the glass in our equipment, saying that because the light has been through so many pieces of glass, the image therefore will naturally be not that good. Undeniably, it is one of the causes but the culprit of the problem is often time from misalignment.
2. Rotability of the DIY for the purpose of taking both landscape and portrait shots
You see two screws in the middle of the shaft of the DIY. If I unscrew them, I can rotate the rear part of the adaptor freely to allow for both landscape and portrait types of shooting.
I have included a vertical support at the very end of the DIY to back up the whole horizontally hanging attachment from the fieldscope. Such helps to stabilize the camera while I am doing metering, focusing and shutter release. There is an additional screwing device to fasten the barrel of the support on the barrel of the DIY. To rotate the camera centrifugally, I have to unfasten the screw in the first place. Make sure that all the three screws for controlling centrifugal turning be fastened before shooting to ensure that central alignment is in place before shooting.
3 Protractability of the Adaptor
The length of the adaptor can be adjusted in accordance with the type of eyepiece and compact camera you use. The flexibility makes it possible for the best distance between the eyepiece and the zoom lens to be adjustable. In this sense, if you have the DIY, you can use it on all type of compact cameras in the market. Bear in mind this: the ideal zoom range for compact cameras suitable for digiscoping should be within 3X or 4X. Longer than that, the zoom lens will collide with the eyepiece as the lens zooms in for telephotographic shots.
4 Ricoh Converter Tube
The screw size of the black Ricoh converter tube is 43mm. A DIY attachment plate has to be made separately to allow for connection.
You see blue tag being used. The connection of the converter tube with the camera body is firm but it can still tilt a little bit as a result of the weight from the camera body. The blue tag is to make the connection even more rigid to ensure perfect central alignment.
5. The black long plate
The length is about 40cm. Too short, you cannot house the vertical support for the horizontal attachment from the fieldscope. Too long, it comes on the camera disallowing vertical framing.
There are two screw holes on the long plate, which are for the purpose of locking the foot of the fieldscope to the long plate. The dual locks do away lateral twisting or to-and-fro sliding of the fieldscope on the long plate.
As you can see, I have also provided a pair of silver-colored brackets right behind the foot of the fieldscope. This helps further to fix the fieldscope on the fieldscope.
6. Video-type Tripod Head
It is by Manfrotto, the 501, which is a cheap but good enough model in comparison to the ones by Gitzo.
I prefer video head for two reasons: lower centre of gravity as the fieldscope set is right on the plane of the video head; and the tilting handle is especially good for swiftly tilting and rotating the video head for efficient bird tracking.
Hope the information is of help to those who would like to do something about digiscoping.
Cheers,
Peter
Postscript:
A word on the quality of Ricoh’s 24-72mm zoom lens that I am using on the GXR for digiscoping:
1. Vignetting occurs from 24-32mm and from 65-72mm of the whole zoom range in the case when a 30x-eyepiece is used;
2. The lens is not sharp enough for digiscoping purposes;
3. The JPEG image is vivid and the tone tends to be a little bit on the contrastive side;
4. The RAW image is not treatment friendly. Noises increase with the number of treatments you impose on your shot.
[ Last edited by lwingkay at 10/10/2010 11:03 ]
Welcome to HKBWS Forum 香港觀鳥會討論區 (http://www.hkbws.org.hk/BBS/)